
The Button question type is commonly used for cause and effect. This means that when the form user clicks the button, they cause something to occur. Common form buttons include navigation buttons to help a form user step through the form and save their progress as they go, save buttons to save progress, submit buttons to finalize and send the form to the appropriate location, ect.
The Button question type supports the following settings:
· Attribute:
· Events
1. Log in to JICS as an Administrator and access EX FormFlow - Forms.
2. Click on the form you are working with.
3. Click Add Question. The Add Item window appears.
4. In the Unique ID field, enter an identifier for the button.
5. From the Type drop-down pick list, select Button.
6. In the Text field, enter and format the label you want to use to describe the button.
7. Text is automatically added to the button.
8. If you are grouping fields, enter the group name in the Group field. Each question being included in the group must have the same group name in this field.
9. If you are using a collection grid:
a. Select the grid you are associating the button with from the Grid drop-down.
b. Select the appropriate Grid Function from the drop-down.
10. Click the Settings tab.
11. The question is automatically added to the left of the form page. Use the Alignment options to move it to the center or right.
12. To adjust how wide or high the button appears, enter the size you want the button in the Width and Height fields. You can use the percentage of 100 or use px, pt values. For example, if you want the button to be small, enter 50% or 50px.
13. Click the Rules tab to define what happens when the form user clicks the button.
14. Click Add Step.
15. In the first drop-down, select If answer value is and in the corresponding effect field, enter *.
16. In the second drop-down, select the action you want to occur when the form user clicks the button.
17. Repeat steps 14 - 16 to add as many actions you want.
18. Click Save.
Navigation buttons can help your form user step through your form. You can add Previous and Next buttons to each tab/page that will save and monitor the form user's progress. As required information is completed, a check mark appears to let them know it is done.
 |
If your school is licensed to use CRM Candidate, the online application template is available and sets up Previous and Next buttons for you. To make setting up navigation buttons easier, you can create a new online application form and customize the template or copy the navigation button row in the online application form and paste it in your form. |
1. Log in to JICS as an Administrator and access EX FormFlow - Forms.
2. Click on the form you are working with.
3. Click Add Question. The Add Item window appears.
4. In the Unique ID field, enter an identifier for the button.
5. From the Type drop-down pick list, select Button.
6. In the Text field, enter and format the label you want to use to describe the button. For example, Previous or Last.
7. Text is automatically added to the button.
8. If you are grouping fields, enter the group name in the Group field. Each question being included in the group must have the same group name in this field.
9. If you are using a collection grid:
a. Select the grid you are associating the button with from the Grid drop-down.
b. Select the appropriate Grid Function from the drop-down.
10. Click the Settings tab.
11. The question is automatically added to the left of the form page. Use the Alignment options to move it to the center or right.
12. To adjust how wide or high the button appears, enter the size you want the button in the Width and Height fields. You can use the percentage of 100 or use px, pt values. For example, if you want the button to be small, enter 50% or 50px.
13. Click the Rules tab. If you are adding the Next button, proceed to step 21.
14. Click Add Step.
15. In the first drop-down, select If answer value is and in the corresponding effect field, enter *.
16. In the second drop-down, select Tab: Change and the corresponding effect drop-down, select Previous Tab.
17. Click Add Step.
18. In the first drop-down, select And.
19. In the first drop-down, select Tab: Update Progress and in the corresponding effect drop-down, select the previous tab/page you want the user to be directed to.
20. Repeat steps 3 - 13 to add the Next button.
21. Click Add Step.
22. In the first drop-down, select If answer value is and in the corresponding effect field, enter *.
23. In the second drop-down, select Tab: Change and the corresponding effect drop-down, select Next Tab.
24. Click Add Step.
25. In the first drop-down, select And.
26. In the first drop-down, select Tab: Update Progress and in the corresponding effect drop-down, select the next tab/page you want the user to be directed to.
27. Click Save.
A Submit button can send your form through the workflow process, a payment process, a custom stored procedure to send the information to EX, a save process to send information to a specific location, an email process that sends the submitter a confirmation email or a combination of these options.
|
If your school is licensed to use CRM Candidate, the online application template is available and sets up a Submit button for you. To make setting up the Submit button easier, you can create a new online application form and customize the template or copy the Submit button row in the online application form and paste it in your form. |
1. Log in to JICS as an Administrator and access EX FormFlow - Forms.
2. Click on the form you are working with.
3. Click Add Question. The Add Item window appears.
4. In the Unique ID field, enter an identifier for the button.
5. From the Type drop-down pick list, select Button.
6. In the Text field, enter and format the label you want to use to describe the button. For example, Submit or Complete.
7. Text is automatically added to the button.
8. If you are grouping fields, enter the group name in the Group field. Each question being included in the group must have the same group name in this field.
9. If you are using a collection grid:
a. Select the grid you are associating the button with from the Grid drop-down.
b. Select the appropriate Grid Function from the drop-down.
10. Click the Settings tab.
11. The question is automatically added to the left of the form page. Use the Alignment options to move it to the center or right.
12. To adjust how wide or high the button appears, enter the size you want the button in the Width and Height fields. You can use the percentage of 100 or use px, pt values. For example, if you want the button to be small, enter 50% or 50px.
13. Click the Rules tab.
14. Click Add Step.
15. In the first drop-down, select If answer value is and in the corresponding effect field, enter *.
TIP: Because buttons don't give users a choice, this field is always *.
16. In the second drop-down, select Form: Submit.
17. Click Add Step.
18. In the first drop-down, select And.
19. There are several options:
a. To send the submitter through the online payment process, select Payment: User Profile from the first drop-down option and the appropriate payment profile from the second drop-down.
|
Only the online profiles you have set up are available. See Set Up Payment Profiles for more information. |
b. To send the form through the approval process, select Workflow: Use Approval Track from the drop-down option and the workflow process you want to use from the second drop-down.
|
Only the workflow approval track you have set up are available. |
c. To
send the submitter a confirmation or notification email, select Email: Send and from the drop-down
option select an email template to be used. To create a new email
template, click the Add icon. To update the existing email template, click the Edit
 icon. See Working with
Email Templates for more information.
icon. See Working with
Email Templates for more information.
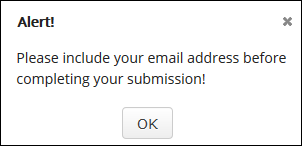
d. To show the submitter a message, select Alert: Show message. A blank field appears where you can enter text you want shown in a pop-up notification. This can be useful when you want to keep a user from submitting their form until information has been completed. Example
20. Repeat steps 7 - 19 to add as many actions you want to occur when the user clicks the button.
21. Click Save.
A Save and Quit button works in conjunction with allowing form submitters to create a temporary account so they can save their work on a form and return to complete it at another time.
|
If your school is licensed to use CRM Candidate, the online application template is available and sets up a Save and Quit button for you. To make setting up the Submit button easier, you can create a new online application form and customize the template or copy the Submit button row in the online application form and paste it in your form. |
1. Log in to JICS as an Administrator and access EX FormFlow - Forms.
2. Click on the form you are working with.
3. Click Add Question. The Add Item window appears.
4. In the Unique ID field, enter an identifier for the button.
5. From the Type drop-down pick list, select Button.
6. In the Text field, enter and format the label you want to use to describe the button. For example, Save and Quite.
7. Text is automatically added to the button.
8. If you are grouping fields, enter the group name in the Group field. Each question being included in the group must have the same group name in this field.
9. If you are using a collection grid:
a. Select the grid you are associating the button with from the Grid drop-down.
b. Select the appropriate Grid Function from the drop-down.
10. Click the Settings tab.
11. The question is automatically added to the left of the form page. Use the Alignment options to move it to the center or right.
12. Click the Events tab.
13. Click Add Step.
14. In the first drop-down, select If answer value is and in the corresponding effect field, enter *.
TIP: Because buttons don't give users different choices, this field is always *.
15. In the second drop-down, select Form: Quit.
16. Click Add Step.
17. In the first drop-down, select And.
18. In the second drop-down, select Form: Save.
19. If you are using check boxes on your tabs to let users know how much they've completed:
a. Click Add Step.
b. In the first drop-down, select And.
c. In the second drop-down, select Tab: Update Progress.
d. In the third drop-down, select the tab the submitted will be saving.
20. Click Save.
Move a Question/Field to Another Tab
1. Log in to JICS as an Administrator and access EX FormFlow - Forms.
2. Click Manage Forms. The Manage Forms page appears.
3. Click on the form you are working with.
4. Click on the tab you want to work with.
5. Right-click on the question/field to be added to another tab and select Move to Tab. A list of the form tabs appears. Example
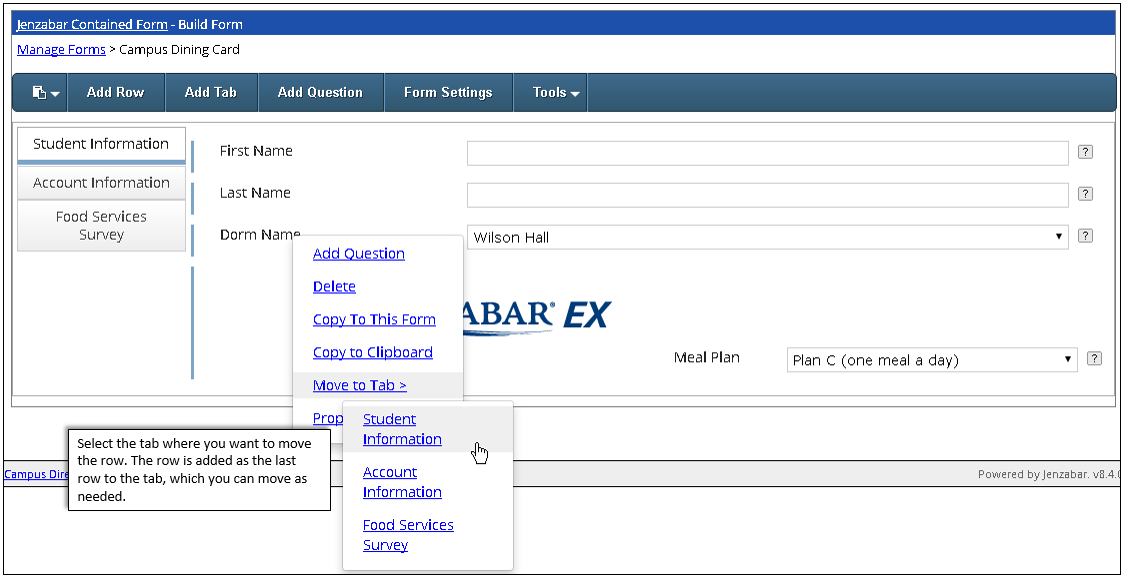
6. Click on the tab where you want to move the row. The row is removed from the tab and added as a new row to the selected tab.
 |
The added row becomes the last row on the tab. Access the tab and move the row to the appropriate location as needed. |
Copy & Paste a Question/Field within the Same Form
1. Log in to JICS as an Administrator and access EX FormFlow - Forms.
2. Click Manage Forms. The Manage Forms page appears.
3. Click on the form you are working with.
4. Click on the tab you want to work with.
5. Right-click on the question/field you want to add as a new question/field on this form and select Copy To This Form. An identical copy of the field/question is pasted to the tab. If the question/field is mapped to EX or your database, you will need to set the mapping up for the new question.
|
You may need to refresh to see the newly pasted row. |
6. Make any needed updates to the question/field definition, settings, and events as needed.
Copy & Paste a Question/Field to Another Form
1. Log in to JICS as an Administrator and access EX FormFlow - Forms.
2. Click Manage Forms. The Manage Forms page appears.
3. Click on the form you are working with.
4. Click on the tab you want to work with.
5. Right-click on the question/field you want to add to another tab and select Copy to Clipboard.
|
You can add multiple copied questions/fields to the clipboard. Just pick each question/field one at a time and select Copy to Clipboard. They will be available from a drop-down list when you go to paste them into the new form. |
6. Click Manage Forms.
7. Click on the form where you want to paste the question/field.
8. Access the tab where you are pasting the question/field.
9. From
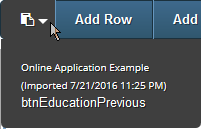
the upper left-hand corner, click the Paste icon. Example
10. Select the question to be pasted into the form. The page refreshes and the question/field is added to the form.
1. Log in to JICS as an Administrator and access EX FormFlow - Forms.
2. Click Manage Forms. The Manage Forms page appears.
3. Click on the form you are working with.
4. Click on the tab you want to work with.
5. Right-click on the question/field you want to remove and select Delete. The confirmation window appears.
6. Click OK. The confirmation window closes and the row is permanently removed.